Plasterboard wall installation is one of the most effective ways to achieve smooth, durable, and professional-looking walls in both residential and commercial spaces. Whether you are building a new partition, lining existing walls, or creating ceilings, the process requires precision, the right tools, and careful planning. When done correctly, plasterboard provides a clean surface ready for painting, wallpapering, or tiling. This detailed guide covers essential steps, techniques, and tips to ensure a flawless finish in your plasterboard wall installation project.
Understanding Plasterboard and Its Benefits
Plasterboard, also known as drywall or gypsum board, is a panel made from gypsum plaster sandwiched between thick sheets of paper. It has become the go-to material for interior walls and ceilings due to its affordability, ease of installation, and versatility. Some of the main advantages of plasterboard wall installation include:
- Quick and easy application compared to traditional wet plaster methods
- Smooth finish that is paint-ready with minimal effort
- Availability in moisture-resistant, fire-resistant, and soundproofing varieties
- Lightweight material that reduces structural load
- Ability to conceal electrical wiring and plumbing within wall cavities
These benefits make plasterboard an ideal choice for modern construction and home improvement projects.
Preparing for Plasterboard Wall Installation
Preparation is a critical step in achieving a flawless finish. Rushing into the installation without proper planning can lead to uneven surfaces, cracks, and costly rework. Before starting, follow these key steps:
Gather Essential Tools and Materials
You will need the following:
- Plasterboard sheets
- Utility knife or plasterboard saw
- Tape measure and spirit level
- Plasterboard screws or nails
- Screw gun or hammer
- Adhesive (if using the dot-and-dab method)
- Jointing tape and compound
- Sanding block or electric sander
- Safety gear (gloves, goggles, dust mask)
Inspect and Prepare the Wall Structure
Check the condition of the framework, whether it is timber studs or metal frames. Ensure all studs are aligned and securely fixed. If you are installing onto masonry walls, clean and level the surface to improve adhesion. Also, confirm that electrical wiring and plumbing are properly installed before fixing the plasterboard.
Measure and Cut Accurately
Accurate measurement ensures a professional finish with minimal waste. Mark your plasterboard sheets carefully before cutting. A sharp utility knife is usually sufficient to score and snap the board, but a saw may be required for complex shapes or cutouts. Always cut slightly smaller than the opening to allow for adjustments.
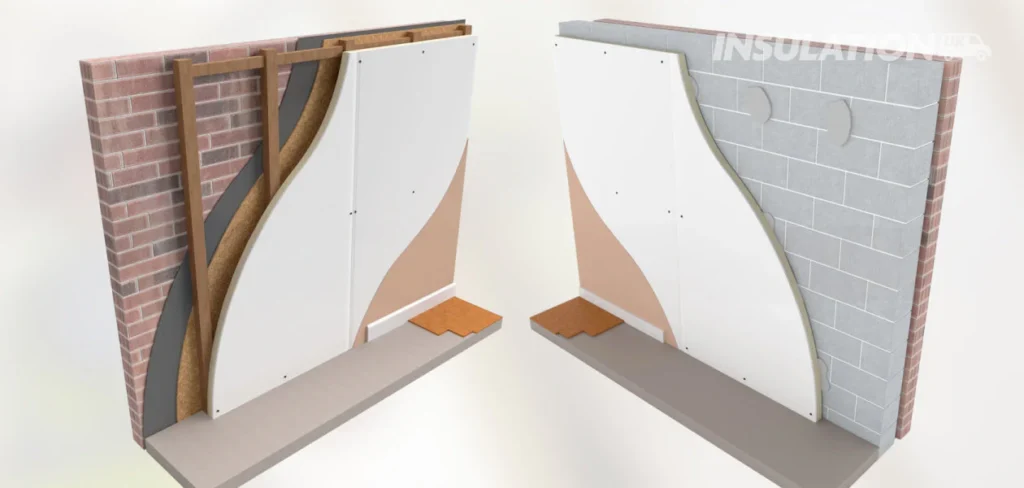
Methods of Plasterboard Wall Installation
There are two primary methods of plasterboard installation: direct bonding (dot-and-dab) and fixing to a stud framework. Both methods have advantages depending on the project requirements.
Dot-and-Dab Method
This technique involves applying adhesive directly onto masonry walls in dabs or vertical lines, then pressing the plasterboard sheet firmly against the wall. It is quicker than stud framing and ideal for solid walls. However, it may not provide as much insulation or soundproofing.
Stud Framework Method
In this method, plasterboard is screwed or nailed onto a timber or metal stud frame. It allows for cavity insulation, better soundproofing, and the concealment of services. This technique is widely used for partition walls and ceilings.
Step-by-Step Process for Plasterboard Wall Installation
Step 1: Position the First Sheet
Start at one corner of the wall and place the plasterboard sheet vertically against the frame or adhesive. Ensure it sits firmly at floor level and use a spirit level to confirm it is straight.
Step 2: Fix the Plasterboard
If using studs, secure the sheet with plasterboard screws at intervals of about 200–300mm along the studs. Avoid over-tightening, as this can damage the board surface. For the dot-and-dab method, press the sheet firmly against the adhesive and tap gently with a straight edge to level it.
Step 3: Stagger Joints
To increase strength and reduce the risk of cracks, stagger vertical joints on adjacent rows of plasterboard. Avoid lining up joints across the entire wall.
Step 4: Create Openings for Fixtures
Mark and cut openings for sockets, switches, and other fixtures before fixing the board. A plasterboard saw or rotary cutter makes this task easier and cleaner.
Step 5: Repeat and Fill the Surface
Continue fixing plasterboard sheets across the wall until the entire surface is covered. Check alignment regularly to ensure a flat finish.
Jointing and Finishing Techniques
Once the boards are fixed, the next stage is to create seamless joints and prepare the surface for decoration.
Taping the Joints
Apply jointing tape over all seams to reinforce the plasterboard and prevent cracking. Paper tape is suitable for most joints, while mesh tape works well for quick applications.
Applying Joint Compound
Use a broad knife to apply joint compound (also known as drywall mud) over the taped seams. Feather out the edges to create a smooth transition between boards. Allow the compound to dry fully before sanding.
Sanding for a Smooth Finish
Sand the dried compound lightly to achieve a level surface. Avoid excessive sanding, which can damage the plasterboard. A fine sanding block ensures a consistent finish.
Skim Coating (Optional)
For an ultra-smooth finish, apply a thin skim coat of plaster over the entire surface. This is especially recommended if you are preparing walls for high-sheen paint or glossy finishes.
Tips for a Flawless Plasterboard Wall Installation
- Always leave a small gap (around 5–10mm) between the plasterboard and the floor to prevent moisture damage. This gap can later be concealed with skirting boards.
- Handle plasterboard sheets carefully to avoid edge damage.
- Use moisture-resistant plasterboard in bathrooms and kitchens.
- Apply two or more coats of joint compound for a perfectly smooth finish.
- Prime the plasterboard before painting to seal the surface and enhance paint adhesion.
Common Mistakes to Avoid
Even experienced DIY enthusiasts can make errors during plasterboard wall installation. Be aware of these common pitfalls:
- Over-driving screws, which weakens the board
- Failing to stagger joints, leading to visible cracks
- Skipping tape, which causes seams to split
- Applying too thick a layer of compound, resulting in uneven surfaces
- Ignoring gaps for movement, which can lead to buckling
Maintenance and Long-Term Care
A well-installed plasterboard wall can last for decades with minimal maintenance. To preserve the flawless finish:
- Avoid hanging heavy objects directly on plasterboard without proper anchors
- Repair minor dents or cracks promptly with filler and touch-up paint
- Keep moisture exposure to a minimum in non-waterproof areas
- Repaint walls periodically to refresh the look and protect the surface
Conclusion
Mastering plasterboard wall installation is about more than simply fixing sheets to a wall. It requires preparation, precision, and attention to detail at every stage—from measuring and cutting to taping, jointing, and finishing. By following the essential steps outlined in this guide, you can achieve professional-quality results and enjoy smooth, durable walls that enhance the beauty and functionality of your space. Whether you are tackling a small home renovation or a large construction project, investing time and care into your plasterboard wall installation will ensure a flawless finish that stands the test of time.